http://www.slideshare.net/nicolechapman/how-to-use-picnikcom
This Slide Show will take you threw the very easy process of using Picnik Photo Editing Program i hope you enjoy!!!

Tuesday, February 15, 2011
Monday, February 14, 2011
Angry Birds!
Angry Birds is a puzzle video game developed by Finland-based Rovio Mobile, in which players use a slingshot to launch birds at pigs stationed on or within various structures, with the intent of destroying all the pigs on the playfield. Inspired by a simple sketch of stylized wingless birds, the game was first released for Apple's iOS in December 2009. Since that time, over 12 million copies of the game have been purchased from Apple's App Store, which has prompted the company to design versions for other touchscreen-based smartphones, including those using the Android, webOS, and the Symbian^3 operating systems. Rovio Mobile has supported Angry Birds with numerous free updates that add additional game content, and the company has even released stand-alone holiday versions of the game.
Angry Birds has been praised for its successful combination of addictive gameplay, comical style, and low price. Its popularity led to versions of Angry Birds being created for personal computers and gaming consoles, a market for merchandise featuring its characters and even long-range plans for a feature film or television series. With over 50 million downloads across all platforms, the game has been called "one of the most mainstream games out right now" and "one of the great runaway hits of 2010".
Angry Birds has been praised for its successful combination of addictive gameplay, comical style, and low price. Its popularity led to versions of Angry Birds being created for personal computers and gaming consoles, a market for merchandise featuring its characters and even long-range plans for a feature film or television series. With over 50 million downloads across all platforms, the game has been called "one of the most mainstream games out right now" and "one of the great runaway hits of 2010".
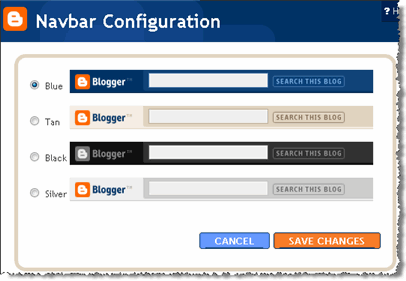
How to Change Your Nav Bar
Did you know that you can change the color of the bright blue navigation bar that runs across the top of Blogger blogs? It's so incredibly simple to do.
To change the color:
1. Go to your blog's layout page.
2. Find the thin, bright blue element labelled "Navbar" that sits above your header element.
3. Click on edit and change the color to your liking. Save.
To change the color:
1. Go to your blog's layout page.
2. Find the thin, bright blue element labelled "Navbar" that sits above your header element.
3. Click on edit and change the color to your liking. Save.
How to Add Pages to your Blog on Blogger
If you don't know how to add pages to your blog, don't sweat.... It is SUPER EASY!
Go to your Posting tab and click on Edit Pages and Click on New Page
 Now Add a Title and some info (it works just like a post), and click Publish Page.
 Finally, pick a Navigation Bar, click Save and Publish, and Done!

Go to your Posting tab and click on Edit Pages and Click on New Page

Sunday, February 13, 2011
Making A Custom Header Using Picnik (FREE)
Step #1: Making the Header
I found this really cool website called Picnik it is so easy to use, and the best part is that it is FREE and NO registration required!! I will show you how I made this header, so that you can make one that is 100% Custom for you!
First, head over to Picnik, and click on Get Started!

Second, I am going to click on Make a Collage.

Then select a layout.

I selected this one and used the Proportions slider to change the height a bit.

Down at the bottom, you can upload your images.

I am going to upload from my Computer. After you upload, drag the photo on to your layout.

I wanted a big spot for my Header title, so I am going to leave the left picture empty. and I am going to change the color to a maroon color that matches my background that I made earlier.

After you get the right color, I have used the Roundedness slider to make the image have rounded edges.

Now just Click on Done in the top right-hand corner.

Now I want to work on the text, so I am going to the Text link at the top.

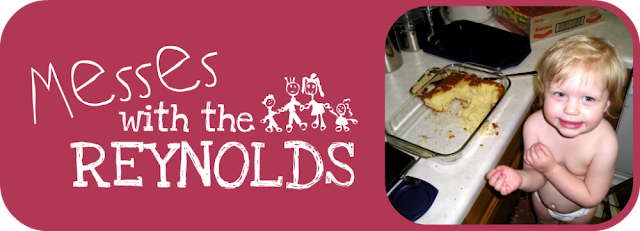
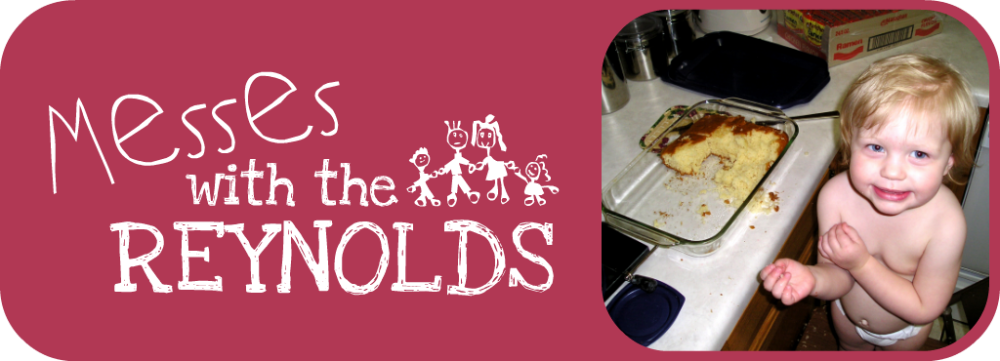
My title is going to be "Messes with the Reynolds", but I don't want to type the whole thing in just one box, because I want to lay it out cute, so I am first going to just type "Messes" and click Add.
 Then pick a cute font. The little circles on the 4 corners allow you to size the word, and the circle on the top allows you to rotate it.

So after I added a few more Text Boxes, and played with the fonts, this is what I came up with.

Now I would like to add a little embellishment, so I am going to click on Stickers at the top.

I found a cute little family drawing that worked perfectly and just dragged and dropped it on to my Header.
Then I went back to the top and clicked on Frames.

There, I picked Rounded Edges, and adjusted it to match my image.

Now if your background is any other color than white, you will want to select Transparent Corners!

If your header looks the way you want it, just go back to the top and click on the Tab that says: Save & Share.

These are the settings that I used to save my photo. I did 1000px wide, so that it would fit just perfect on my wide 2 column template, and I picked png, so that the corners would be transparent, not white. (JPEG files will not allow you to save transparent).
 Now my saved Header looks like this!! So cute!
Now, you can add your header image as you normally would !
I found this really cool website called Picnik it is so easy to use, and the best part is that it is FREE and NO registration required!! I will show you how I made this header, so that you can make one that is 100% Custom for you!
First, head over to Picnik, and click on Get Started!

Second, I am going to click on Make a Collage.

Then select a layout.
I selected this one and used the Proportions slider to change the height a bit.

Down at the bottom, you can upload your images.
I am going to upload from my Computer. After you upload, drag the photo on to your layout.

I wanted a big spot for my Header title, so I am going to leave the left picture empty. and I am going to change the color to a maroon color that matches my background that I made earlier.

After you get the right color, I have used the Roundedness slider to make the image have rounded edges.

Now just Click on Done in the top right-hand corner.

Now I want to work on the text, so I am going to the Text link at the top.
My title is going to be "Messes with the Reynolds", but I don't want to type the whole thing in just one box, because I want to lay it out cute, so I am first going to just type "Messes" and click Add.
So after I added a few more Text Boxes, and played with the fonts, this is what I came up with.

Now I would like to add a little embellishment, so I am going to click on Stickers at the top.

I found a cute little family drawing that worked perfectly and just dragged and dropped it on to my Header.
Then I went back to the top and clicked on Frames.

There, I picked Rounded Edges, and adjusted it to match my image.

Now if your background is any other color than white, you will want to select Transparent Corners!
If your header looks the way you want it, just go back to the top and click on the Tab that says: Save & Share.

These are the settings that I used to save my photo. I did 1000px wide, so that it would fit just perfect on my wide 2 column template, and I picked png, so that the corners would be transparent, not white. (JPEG files will not allow you to save transparent).

Now, you can add your header image as you normally would !
Subscribe to:
Posts (Atom)